
How To Fix “Error Code 405 Method Not Allowed” will be described in this article. Encountering any error while visiting a website is annoying for both users and site owners. One such error is the 405 Method Not Allowed error which can lead your visitors to lose faith in your site and look out for alternatives. Thus, you will be losing valuable engagement and sales opportunities.
How To Fix “Error Code 405 Method Not Allowed” In Minutes
In this article, you can know about Error Code 405 Method Not Allowed here are the details below;
When a server gets a request for a legitimate website but rejects the HTTP method used for the search, it returns a response status of 405. It often lacks in-depth justifications for the rejection. Though rare, it can impact your browsing experience depending on the browser and operating system you use.
In this paper, we will discover the causes behind the “405 Method Not Allowed” error. Then we’ll provide you with step-by-step guidance to resolve this issue within minutes, ensuring your site runs smoothly again. Let’s get started!
Decoding the 405 Method Not Allowed Error
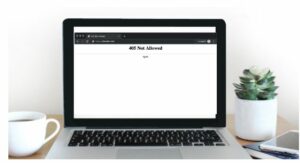
The 405 Method Not Allowed error appears when a web server accepts a request through a browser but declines the particular HTTP method that is related to that request. This HTTP response status code denotes a problem between the client (web browser) & the server. Plus, it is classified as a client error (4xx status replies).
The 405 error is sent by the server whenever a web browser tries to visit a certain webpage or carry out an operation on the website using an unsupported HTTP method. However, this error message can also appear as:
- 405 Not Allowed
- Method Not Allowed
- HTTP 405 Error
- HTTP Error 405 – Method Not Allowed
- HTTP 405 Method Not Allowed
It’s crucial to remember that the 405 error often arises from a client-side problem. This means the web browser’s request is to blame. However, sometimes the web server’s response to the client’s request might also result in an error.
The procedures to fix the 405 Method Not Allowed problem are the same, no matter which particular browser is reporting the error. You may resolve this problem and recover easy access to your website by using a defined troubleshooting procedure.
So, before learning the process to resolve the error, let’s take a look into some common reasons behind it.
Reasons Behind The 405 Method Not Allowed Error

To apply the proper fixes and guarantee seamless communication between the client and the server, it is essential to figure out the precise source of the 405 error. Here are some common reasons behind the error:
Improper HTTP method
The HTTP protocol specifies a number of common ways for a client (usually a web browser) to communicate with a web server. It includes GET, POST, PUT, DELETE, HEAD, and OPTIONS.
The server will return a 405 error if a client attempts to access a particular resource via an unsupported or improper HTTP method. This error could appear, for instance, if you attempt to update data using the GET method rather than the proper POST or PUT technique.
Inaccurate Server Configuration
The 405 error can arise from a web server configuration issue. The HTTP method that the client uses may not be supported by the server’s configuration. This can be the result of an inadequate or erroneous server setup, not even recognizing certain HTTP methods or both.
Cross-Origin Requests
The same-origin policy will fail when making cross-origin requests, which might result in the 405 error. Security controls are in place in browsers to stop scripts from requesting resources from sites other than the one serving the original web page (same origin).
The server will reject and display the 405 error if a client-side script tries to send a cross-origin request using an unsupported HTTP method.
Web App Firewall Restrictions
In certain situations, a web server can be protected against different sorts of threats by the implementation of a Web Application Firewall (WAF). The WAF can be set up to prevent the use of certain HTTP methods that are deemed hazardous or superfluous for the application.
Therefore, the WAF will intercept requests made by clients trying to utilize one of these forbidden methods and return a 405 error.
Access Control & Permissions
Insufficient permissions or incorrect access control settings on the server can also end up displaying the 405 error. In order to stop unauthorized operations, the server may reply with the 405 error when a consumer tries to access a help for which they do not have the required authorization.
Now that you know the common reasons behind the 405 error, let’s focus on some troubleshooting methods:
Finding the exact reason behind the 405 Method Not Allowed can be difficult. But to minimize your effort in fixing it, we’ve come up with the following methods:
1. Verify The URL

Examining the Uniform Resource Identifier (URL) is the first step in resolving the client-side 405 Method Not Allowed issue. This issue often happens as a result of an incorrectly entered URL.
To halt users from accessing erroneous sites (or attempting to reach pages that don’t exist), the majority of web servers are highly protected and built to deny access to inappropriate URLs. As a result, the web browser is unable to visit a page that is not present.
Check the URL carefully for any missing characters or inconsistencies, or typos. The error message may be caused by a seemingly insignificant typographical mistake. Thus, your URL has to be precise and error-prone to serve the webpage properly.
Verify to determine whether the website now loads correctly after making the necessary URL changes. Enter the updated URL in the browser to check that the desired page appears as anticipated.
2. Undo Any Recent Updates
Updates are necessary since it brings bug fixes and the latest enhancement to your WordPress sites. But occasionally, upgrades can cause issues, including the “405 Method Not Allowed” error.
- Pinpoint Recent Updates: If you are facing the 405 Method Not Allowed error after implementing a recent update, it could be the reason behind the error. This applies to both WordPress core updates as well as any update on your themes and plugins.
- Consider Rollback: Consider going back to the prior WordPress version if you think an upgrade is the root of the problem. Before continuing, make sure you have a complete backup of your website. It is essential to take a backup before preventing any permanent alteration on your site.
- Using a Plugin for Rollback: Although there is a manual rollback option, using a plugin speeds up the procedure. Therefore, we suggest the plugin WP Downgrade for reverting to the previous version. It streamlines the rewind process, cutting down on the likelihood of any errors.
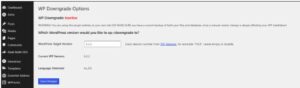
- Execute Rollback with Precision: You can easily start the rollback process using the WP Downgrade plugin. For a precise version downgrade, simply follow the instruction and insert the version that you want to revert back into.
- Monitor and Proceed: Check your site for stability and roll back the most recent version if it fixes the “405 Method Not Allowed” problem. Once you’re sure that the issue has been fixed, you can decide whether to reapply the updates or roll back to the most recent version using your backup.
3. Uninstall Plugins & Themes
Plugins & themes play a vital role in enhancing the functionality and visuals of your WordPress site. You can personalize the outlook of your website using a theme and introduce new features and simplify complex tasks using a plugin. Also check Status Code 400 Errors
Identifying Potential Issues: It’s crucial to recognize that plugins and themes can cause problems, just as software upgrades do. This results from the fact that including new features changes how the site functions. Moreover, conflicts or compatibility issues between several plugins and themes and WordPress versions can also arise.
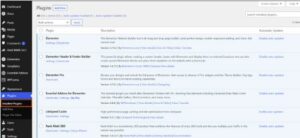
Uninstalling Problematic Plugins: Consider removing certain plugins that might be the root cause behind the 405 Method Not Allowed Error. Start by going to the Plugins tab on your WordPress dashboard. A complete list of all installed plugins may be found here:
- Login to your WordPress admin dashboard
- & guide to the Plugins > Installed Plugins
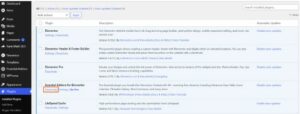
- Sequential Plugin Uninstallation and Testing: You can start the troubleshooting procedure by uninstalling each plugin individually. Examine your website after each removal to see whether the mistake still exists. This methodical technique helps in pinpointing the precise plugin in charge of the issue:
- Deactivate a plugin.
- Check your website for the error.
- If the error persists, reactivate the plugin and proceed to the next one.
Addressing Theme-Related Issues: After the plugin evaluation, continue with your current theme. To determine if the theme is causing the issue, repeat the testing and uninstalling steps:
- Access the “Appearance” section in your WordPress dashboard.
- Activate the default theme (e.g., Twenty Twenty-three).
- Check if the error persists.

Deciding on the Right Action: If the plugin is vital for your site’s operation or business goals, contact the developer. Otherwise, consider removal or finding an alternative. However, prioritize a plugin or theme that keeps your site’s functionality without causing any errors.
4. Review Database Modifications
The “405 Method Not Allowed” can be the result of any kind of database modification. Many authorizations can be provided for different plugins or themes installed on your site. Plus, those themes and plugins can have access to your database.
So, removing an extension won’t always resolve the 405 error that is occurring on your site. You must review and resolve the changes that were made in your database.
Accessing Database and SQL Tab: Depending on the kind of database you’re using, different methods must be followed while checking for changes in your database. To evaluate database adjustments, you can go with the following actions:
- Access your cPanel using the login credentials.
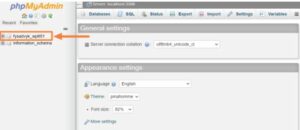
- Scroll down to the Database province and click on phpMyAdmin.

- Now, select your database from the left-hand side of the phpMyAdmin.
Access The SQL Tab To Run Query: At this stage, you need to enter a query and replace it to find anomalies through the latest updates.
- Select the SQL tab of your database.
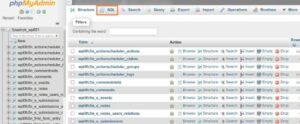
- A screenshot of the phpmyadmin dashboard.
Enter the following query and replace the dbname with your database name.
- Identify Suspicious Tables and Records: Examine every table and record in your database to see if any may have been tampered with by plugins. Followed by going to the next step if you find any illicit changes.
- Reverse undesirable changes: Revert any unwanted changes that have been made to your database quickly. This phase could include going back to an earlier configuration or implementing certain modifications.
Hopefully, the “405 Method Not Allowed” error is now resolved by methodically following the above-mentioned processes.
5. Verify Your Server’s Configuration
You can verify your server configuration through the cPanel and verify if any potential change is causing the 405 error. So, check out the following steps:
- Access cPanel: Access the cPanel offered by your hosting company by logging into your account. You can handle a number of elements of your website using this platform, including server setup.
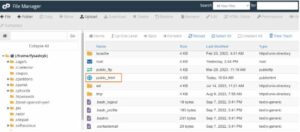
- Locate File Manager: Go to the “Files” section of cPanel and choose “File Manager.” You can browse and manipulate files in the folders of your website with the help of this application.

- Enter the Root Directory: Locate and choose the root directory of your website once you are in the File Manager. Generally, this goes by the name “public_html” or matches your domain name.
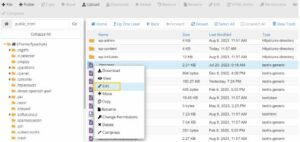
- Explore and modify the .htaccess file: Search the root directory for the .htaccess file. Select “Edit” from the menu after you right-click on the file. You are then able to change the file’s contents.
Check & Comment Out Rewrite Directives: Look for lines with Rewrite directives in the .htaccess file. The alteration and redirection of URLs are controlled by these directives.
Investigate any possible directives that might be resulting in the “405 Method Not Allowed” issue. Add a “#” hashtag at the end of the line that contains [R=405, L]
- Save Modifications: Once the appropriate adjustments have been made, save the modifications to the .htaccess file. Plus, Make sure your modifications are precise and consistent with your troubleshooting procedures.
- Test and Observe: Consider the problematic rewrite directives and visit your website and check its usability. So, keep an eye out for the “405 Method Not Allowed” warning. If the problem is fixed, it means that the commented-out instructions were a factor in the issue.
6. Explore Server-Side Logs

The majority of online apps keep server-side logs that track their interactions and activity. Application logs provide a thorough history of all program operations, such as requested pages and database results.
- Grasp the Distinction: Application vs. Server Logs: Differentiate application logs from server logs. In contrast to application logs, server logs pertain to the infrastructure that supports the application. Server logs provide insight into the health, status, and performance overview of the server.
- Access WordPress Server Logs: Use Secure File Transfer Protocol (SFTP) to gain access to your WordPress server’s records. Locate the “logs” folder within the directory’s origin. This directory contains your WordPress access logs and error logs, named
- “Access.log” and
- “Error.log.”
- Navigate Through Logs: Examine the data sequentially, using a method similar to that of previous phases. Moreover, Check the contents for any anomalous entries that may indicate problems. Besides, you can Collaborate with a developer, if necessary, and conduct a thorough analysis.
- Seek Developer Assistance: Consult your developer if you face log entries that look unusual or require expert interpretation. Their knowledge can aid in identifying anomalies and possible causes of the “405 Method Not Allowed” error.
7. Validate The A Records
To resolve the “405 Method Not Permitted” error, look into your Domain Name System (DNS) records. Emphasize the A records, which refers to DNS record that maps a part or subdomain to an IP address. Here goes the process to validate the A records using cPanel:
Log into your cPanel account: Sign in to your hosting provider-provided cPanel account to access your DNS records. This action ensures the authenticity of your A records by facilitating their verification.

Access DNS Zone Editor: Within your cPanel, Scroll down to the Domains section and click the Zone Editor option. This utility enables you to administer and modify the DNS records for your domain.How to add domains in wordpress.
Inspect A Record Details: Access your DNS Zone Editor and review the specifics of your A records. Moreover, you need to verify the following details:
- Type: Ensure that the record type is correctly set as A.
- Name: Make sure that the name aligns with “@” if the domain or subdomain corresponds to an IP address.
- A list of email addresses with an orange arrow pointing to them.
- Points to: Verify that the domain or subdomain accurately points to the intended IP address.
- Time to Live (TTL): Assess the TTL value, indicating the duration for which the DNS resolver caches the query. The typical setting is 14400 seconds or 4 hours, although this may vary based on your hosting provider.
8. Reset Files & Folders Permission
To determine the “405 Method Not Allowed” error, you can also revert the file permission to its default value. Follow these stepped approaches to reset file and folder permissions using cPanel:
- Login to your cPanel
- Navigate to the Files section & click File Manager

- Choose any Files or Folders that you want to reset your permissions into.
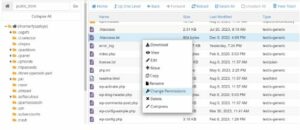
- Right-click on a file or folder & click Change Permission.
- In the “Change Permissions” window, you’ll see numeric values representing permissions for the owner, group, and public.
- Now, set permissions into their default values which should be:
- Directories: 755 (drwxr-xr-x) and
- Files: 644 (-rw-r–r–)

9. Contact Your Hosting Provider
If you’ve continued reading, it suggests that the previously discussed methods have not resolved the 405 Error. This indicates that your issue is more complex, and it’s unlikely to be something that you can personally resolve. Plus, you may lack advanced technical skills or be willing to resolve the issue without taking any risk of losing your site’s data. Also check Roblox Error Code 279
However, the optimal course of action should be to contact your hosting provider immediately. Simply access their 24/7 customer support, live chat, and ticketing system to get a swift solution.
Concluding Words
You can resolve any website issue, including 405 Method Not Allowed errors, with the right solution in hand. Therefore, we have devised the aforementioned methods to effectively address the error and ensure your site’s availability. Also, consider implementing these preventive measures to avoid the error:
- Routinely check your server-side logs and web server configuration.
- Install compatible themes and plugins that do not conflict with your site.
- All the URL entries of your website should be accurate.
- Allow only approved HTTP methods for specific resources, skipping unauthorized attempts.
- Enforce robust user authentication to ensure that only authorized users can take certain actions.
- Install a WAF to intercept and prevent unauthorized method requests from reaching the server.
- Conduct regular code reviews to identify any discrepancies or flaws in HTTP methods.


