
How To Fix DNS Server Unavailable Complete Guide will be described in this article. All domain names for the websites you’ve visited are stored on the Domain Name System or DNS server. Well, when you search for a domain name in a web browser, your router forwards the request to a DNS server. If the domain name of the respective site has been saved, it returns the corresponding IP address. This significantly speeds up the loading process for those sites. Even though this process is excellent, it is not uncommon for the DNS server to occasionally fail to establish a link. In this case, troubleshooting your web browser will frequently result in a ‘DNS server not responding’ error. This error could appear on your screen due to a variety of factors. The most obvious is the possibility that the server itself is currently down. Fortunately, this DNS Server Unavailable problem is often accompanied by a few simple solutions.
How To Fix DNS Server Unavailable Complete Guide
In this article, you can know about How To Fix DNS Server Unavailable Complete Guide here are the details below;
How To Fix DNS Server Unavailable?
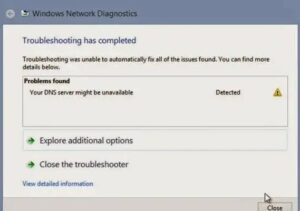
Have you ever got an error message stating that the DNS server is unavailable? These issues can be resolved by changing browsers, fiddling with some firewall settings, or rebooting your router. Well, It will be your responsibility to determine the cause of the problem and then correct it.
Use a other browser to access the web pages you’re attempting to open. If you get the error while using Mozilla Firefox, try switching to Microsoft Edge or Google Chrome. Then, if the problem continues, we can test other devices. To ensure the problem isn’t due to hardware failures, try opening a webpage on the same network with a mobile device. It would also be useful to attempt connecting to the exact web pages using your data plan to determine if the problem is, in fact, with the DNS server. After you’ve gone through all of these steps, reboot your router. If the “DNS server unavailable” error persists, we must try a few more effective methods.
Flushing Your DNS (MacOS)
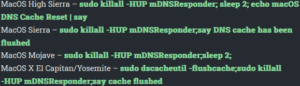
On a Mac, you can flush the DNS. The method you use will differ slightly depending on the version of Mac your computer is running. Often, all that’s required is a change in the syntax used during the process.
- Open a Finder window and/or navigate to Applications, Utilities, and the Terminal.
- Enter the following syntax for the macOS version you’re currently using.
- Press the Return key once more, enter your password, and then press the Return key again.
- Before exiting the Terminal, listen for an audio alert indicating a successful DNS flush.
A few extra steps will be required to flush out the MacOS X cache fully. In addition to the previous steps, you must flush both the MDNS and UDNS caches. Execute the following commands before exiting the Terminal.
- Run sudo discoveryutil mdnsflushcache to flush the MDNS cache.
- Run sudo discoveryutil udnsflushcaches to clear the UDNS cache.
Flushing Your DNS (Windows)
The most effective way to resolve the DNS server unavailable issue is to use Command Prompt to flush it.
- Open the Run dialogue by pressing the Windows and/or R keys simultaneously.
- In the cmd field, type cmd and press Enter.
- Enter ipconfig /flushdns and/or press Enter in the Command Prompt window.
DNS Server Unavailable
- After that, type ipconfig /release and press Enter.
DNS Server Unavailable
- Finally, type ipconfig /renew and hit the Enter key.
DNS Server Unavailable
- Exit the Command Prompt window & reboot the system.
Remove Multiple Antiviruses
“There is no such thing as too much protection.” This may be true in the real world, but in the world of technology, having many antivirus programs installed on the same PC can reduce the level of protection. Check to see if you’ve two or more antivirus programs running simultaneously, as this could be the source of the DNS problem. After you have disabled all additional programs, reboot your system, and the problem should be resolved. To help defend yourself against unwanted malware attacks, ensure that you only run a single software program in the future. This improves security and may help you avoid more DNS server errors.
Changing DNS Servers
If you’ve tried all the solutions listed here and are receiving the “DNS server unavailable” error, it might be time to change DNS servers. There are numerous public DNS servers, with Google’s free DNS being among the most popular. This simple process can be completed in a few clicks, depending on where you want to change it. We’ll use the Windows operating system in each of our examples. Also check websites to buy expired domains
DNS Changes Via Windows OS
- Open the Run discussion box (Windows key + R) & enter ncpa.cpl to access your network connection properties. Enter your password.
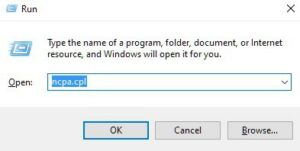
- Windows 10 users can select Network Connections by right-clicking the Windows icon in the desktop screen’s lower-left corner and selecting Network Connections from the menu.
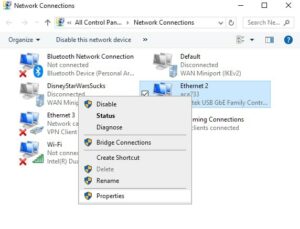
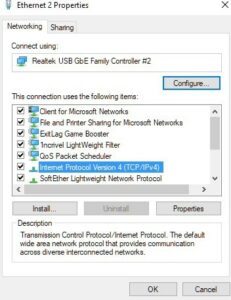
- Pick the network adapter that is currently in use. WLAN refers to WiFi connections, whereas LAN refers to direct connections, typically made via an Ethernet cable. In Windows 10, your options will be on the left side panel. From the main window, pick one and then Change adapter options.
- Right-click your selection and select Properties.
- Pick your IP version (v4 or v6) from the menu and next click the Properties button in the Networking tab.
- Toggle the radial. To enable editing capabilities, use the DNS server addresses.
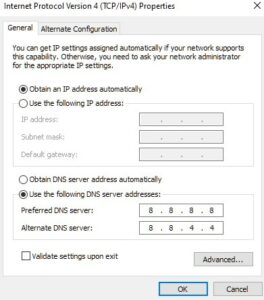
- Enter the DNS server addresses that you intend to use. If you previously used a DNS server that was not obtained automatically, remember to annotate the addresses in case you want to use them again. Also check Discord No Route
- Click OK to confirm the changes.
DNS Changes Via Router
- Launch the web browser and enter the Default Gateway speech into the URL bar to access the router. Open a command prompt window, enter ipconfig, and press Enter to find the Default Gateway. Here, in the pulled-up information, copy the numbers next to Default Gateway.

- Log in to the router with the correct credentials.
- Locate your internet account information, frequently found in a tab with a similar name.
- Navigate to the DNS server and select the option that best matches your internet protocol (IPv4 or IPv6).
- Enter the DNS server address with which you want to replace the current one. Google’s DNS server will be 8.8.8.8 in the preferred DNSv4 server and 8.8.4.4 in the alternate DNS configuration.
- Save the changes and exit the router interface.
Test New DNS Server
After you’ve changed the DNS servers.
- Launch a browser and attempt to open a well-known website, such as www.google.com. If the site is immediately accessible, the new DNS is up and running.
- If not, input one of Google’s IP addresses, 172.217.16.195, into your browser and press Enter.
- Wait for the familiar Google logo, followed by the search bar. If this fails, the problem may be with the internet rather than the DNS server.
- If this is the problem, contact your internet service provider for assistance.


