
How To Control Fan Speed On Windows 10 will be discussed in this article. Every laptop and computer comes with built-in fans. Since all gaming systems get hot, you don’t need to buy a high-end gaming rig or gaming laptop to have fans on your system.
How To Control Fan Speed On Windows 10
In this article, you can know about How To Control Fan Speed On Windows 10 here are the details below;
When a system boots up, the fans often start off louder before becoming quieter. If you start consuming more system resources, such as by having a number of Chrome tabs open, they will start running again or more quickly.
How to Control fans speed
The spectators are skilled at knowing when to speed up and when to slow down. They have sensors inside that continuously check your system’s temperature, and when it rises above a particular point, they begin to spin to cool it down.
It’s crucial that you never block the vents on your laptop or computer because the chassis is built to let air flow out. The fans will also run if your PC is performing system-demanding tasks in order to maintain the temperature.
Users cannot access the temperature sensors, the limits placed on them, or the different fan speeds. This is so that most people can’t determine how hot their system is or when to turn on or off the fans.
Your PC is wasting more energy than necessary if fans are running constantly, which will probably cause the adapter to overheat. The delicate balance between keeping a system cool and not overloading it must be kept.
You must do it at your own risk if you wish to change the fan speed on Windows 10. Keep in mind that if your computer or laptop overheats, you risk permanently damaging the hardware, necessitating a replacement.
You need to download a third-party program to manage fan speed. The app you use is influenced by your hardware.
You should be able to find one of the two apps we’re recommending here that can identify your fans and let you adjust their speed.
- SpeedFan
- HWiNFo
To regulate the fan speed on Windows 10, install the program and adhere to the steps listed below.
1. Control fan speed on windows 10 with SpeedFan
- Run SpeedFan after installing it.
- ‘Configure’ button should be clicked on the app’s main window.
- The window will change. Activate the Fans tab.
- As the app searches for and lists your fans, wait.
- Choose the fan that ought to be controlled.
- The fan rate can be adjusted using the response curve.
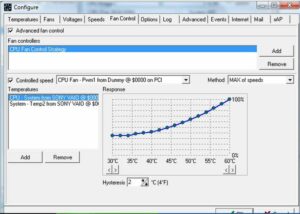
Response Curve
When your system gets hot, fans start to run. Heat and fan speed are mapped by the response curve. The fans will operate more quickly as the system becomes hotter.
2. Control fan speed on Windows 10 with HWiNFo
To use HWiNFo to regulate the fan speed, follow these steps.
- Launch the application, then select Sensors from the main pane.
- Authenticate the pop-up message.
- Your system’s numerous sensors will be listed in a new window that will appear.
- A fan button is located at the bottom. Toggle it.
- Up to three fans are listed in a new window that will open. Pick one of the running fans.
- To adjust the fan speed manually, click “Set manual.”
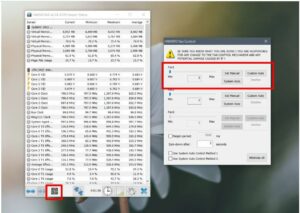
HWiNFO does not map speed to PC temperature, therefore use it with extreme caution. Find a means to keep an eye on the temperature of your GPU and CPU to prevent overheating. Also check Blue Screen Error on Windows
Did this work for you?
If any of the following solutions worked for you, please let us know in the comments section below. We love to hear from our readers if we were able to solve their problem.


